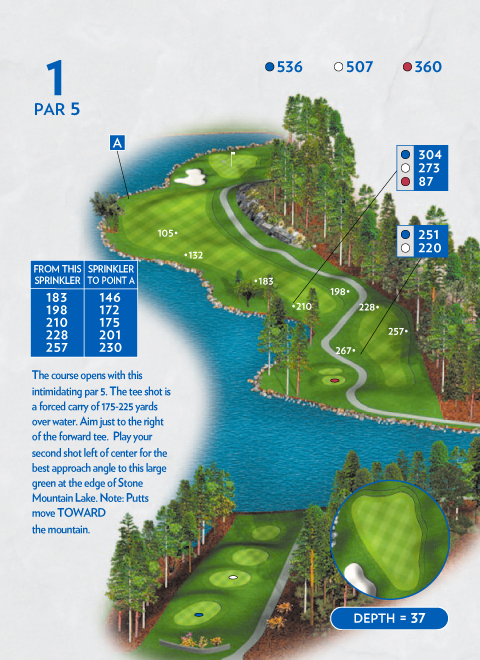
Hole 1 Par 4
Description
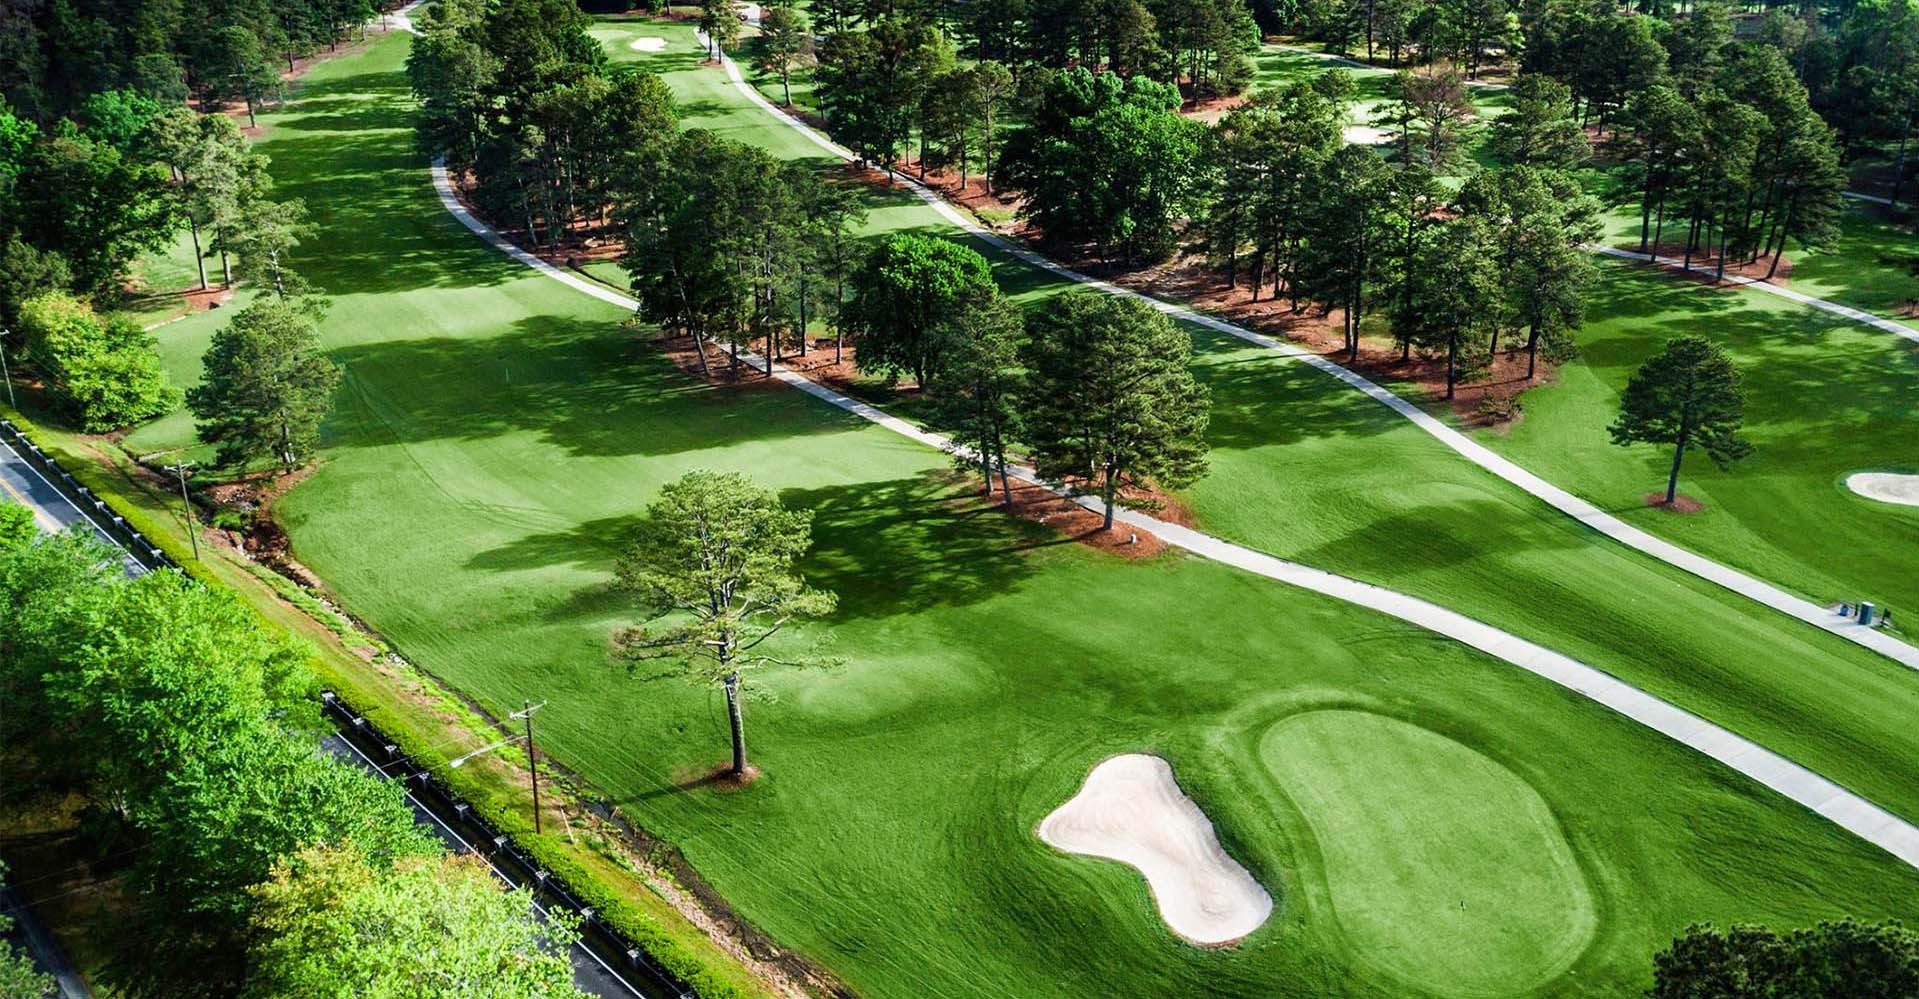
The course opens with this intimidating par 5. The tee shot is a forced carry of 175-225 yards over water. Aim just to the right of the forward tee. Play your second shot left or center for the best approach angle to this large green at the edge of Stone Mountain Lake. Note: Putts move TOWARD the mountain.
| Red | 360 |
| White | 507 |
| Blue | 536 |
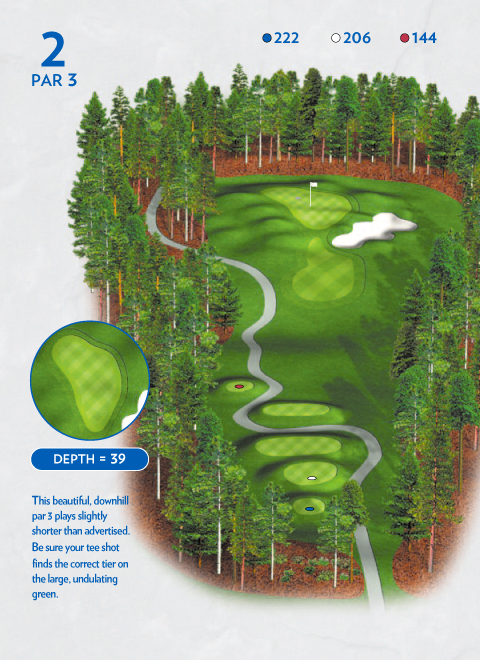
Hole 2 Par 3
Description
This beautiful, downhill par 3 plays slightly shorter than advertised. Be sure your tee shot finds the correct tier on the large, undulating green.
| Red | 144 |
| White | 206 |
| Blue | 222 |
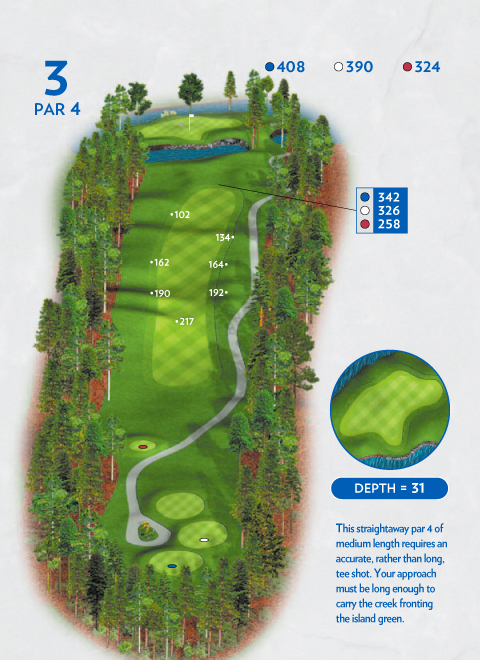
Hole 3 Par 4
Description
This straightaway par 4 of medium length requires an accurate, rather than long tee shot. Your approach must be long enough to carry the creek fronting the island green.
| Red | 324 |
| White | 390 |
| Blue | 408 |
Hole 4 Par 4
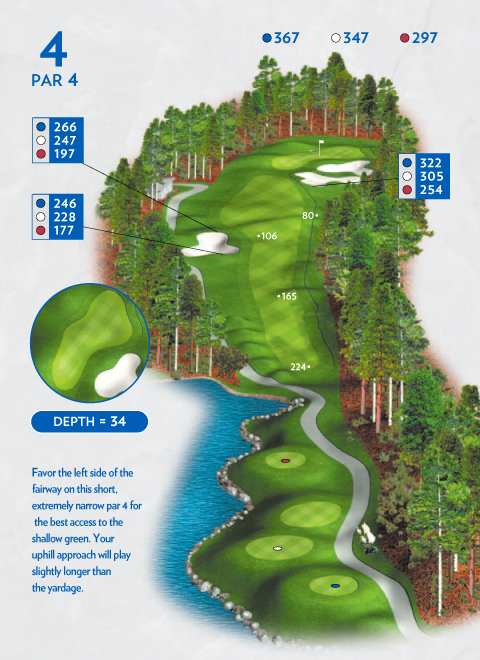
Description
Favor the left side of the fairway on this short, extremely narrow par 4 for the best access to the shallow green. Your uphill approach will play slightly longer than the yardage.
| Red | 297 |
| White | 347 |
| Blue | 367 |
Hole 5 Par 4
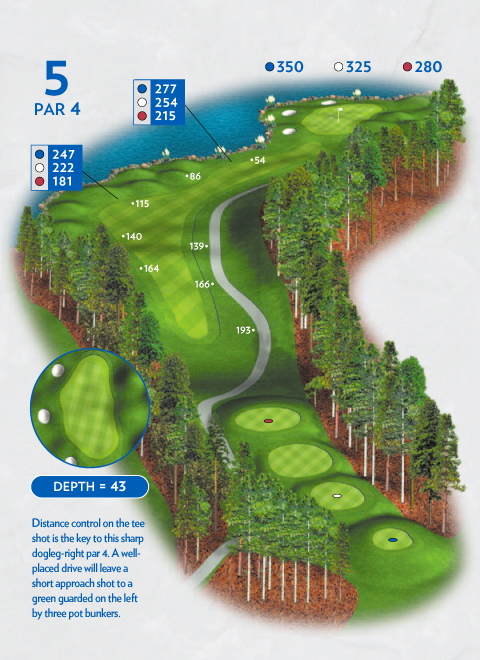
Description
Distance control on the tee shot is the key to this sharp dogleg-right par 4. A well-placed drive will leave a short approach shot to a green guarded on the left by three pot bunkers.
| Red | 280 |
| White | 325 |
| Blue | 350 |
Hole 6 Par 3
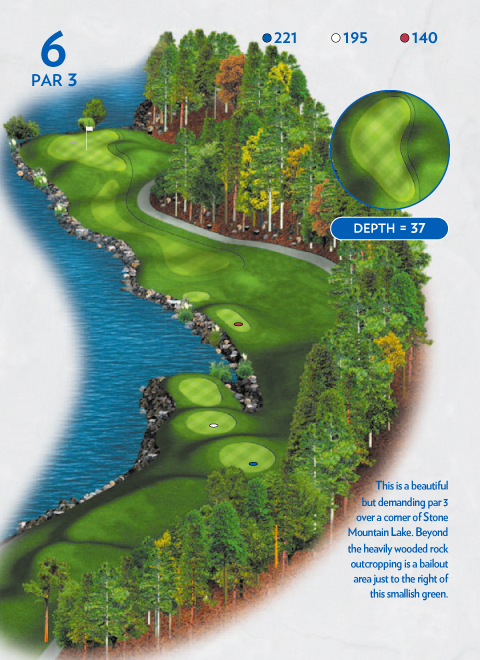
Description
This is a beautiful but demanding par 3 over a corner of Stone Mountain Lake. Beyond the heavily wooded rock outcropping is a bailout area just to the right of this smallish green.
| Red | 140 |
| White | 195 |
| Blue | 221 |
Hole 7 Par 4
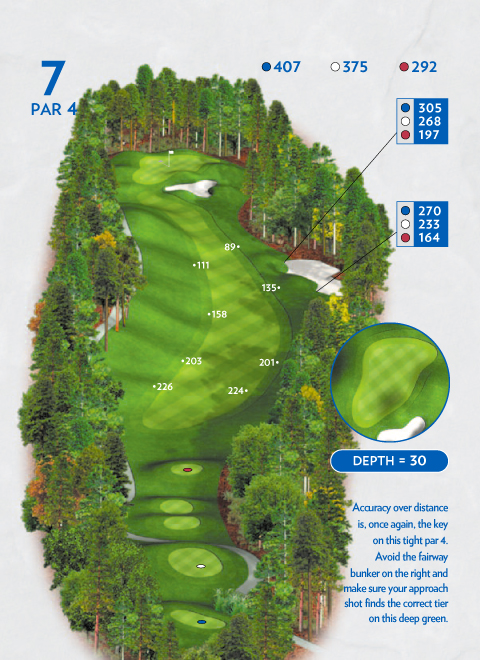
Description
Accuracy over distance I, once again, the key on this tight par 4. Avoid the fairway bunker on the right and make sure your approach shot finds the correct tier on this deep green.
| Red | 292 |
| White | 375 |
| Blue | 407 |
Hole 8 Par 3
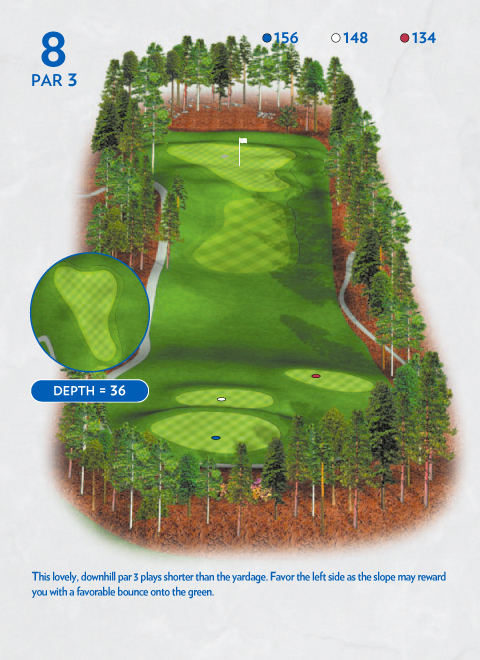
Description
This lovely, downhill par 3 plays shorter than the yardage. Favor the left side as the slope may reward you with a favorable bounce onto the green.
| Red | 134 |
| White | 148 |
| Blue | 156 |
Hole 9 Par 5
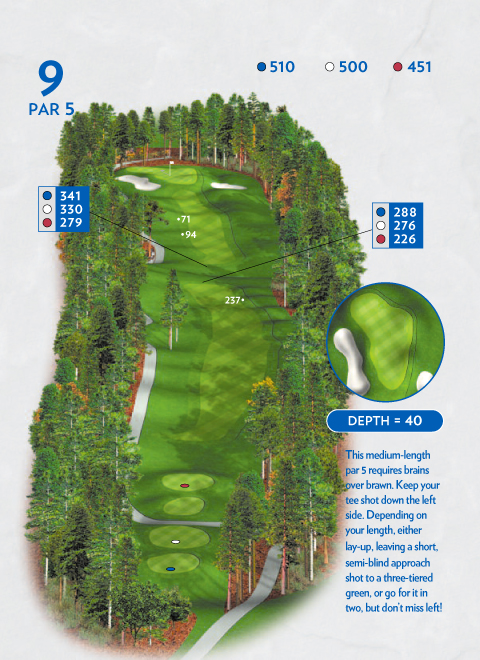
Description
This medium-length par 5 requires brains over brawn. Keep your tee shot down the left side. Depending on your length, either lay-up, leaving a short, semi-blind approach shot to a three-tiered green, or go for it in two, but don’t miss left!
| Red | 451 |
| White | 500 |
| Blue | 510 |
Hole 10 Par 4
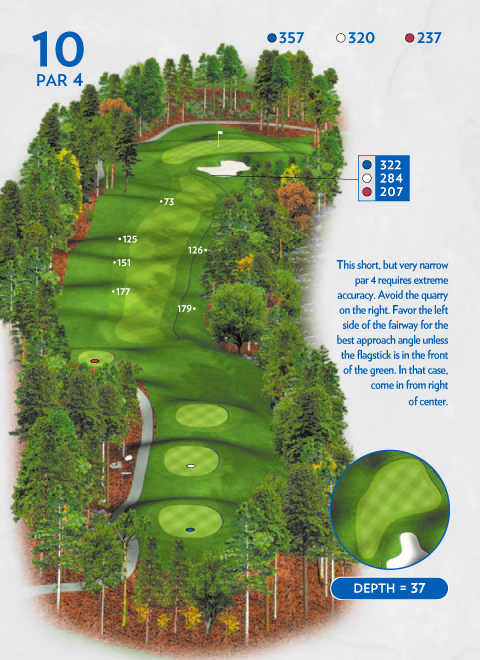
Description
This short, but very narrow par 4 requires extreme accuracy. Avoid the quarry on the right. Favor the left side of the fairway for the best approach angle unless the flagstick is in the front of the green. In that case, come in from right of center.
| Red | 237 |
| White | 320 |
| Blue | 357 |
Hole 11 Par 4
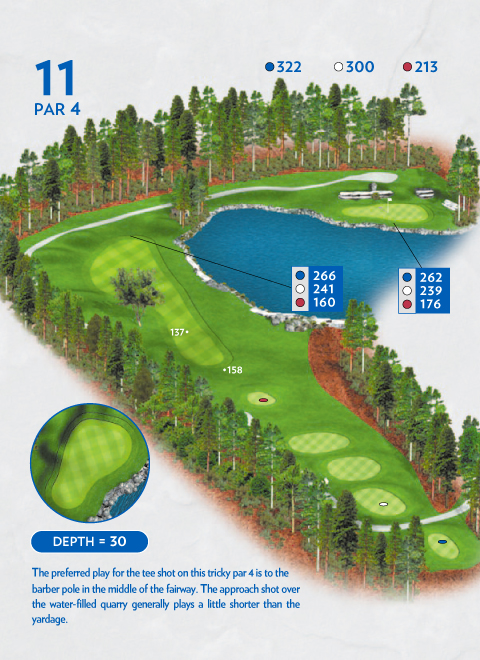
Description
The preferred play for the tee shot on this tricky par 4 is to the barber pole in the middle of the fairway. The approach shot over the water-filled quarry generally plays a little shorter than the yardage.
| Red | 213 |
| White | 300 |
| Blue | 322 |
Hole 12 Par 5
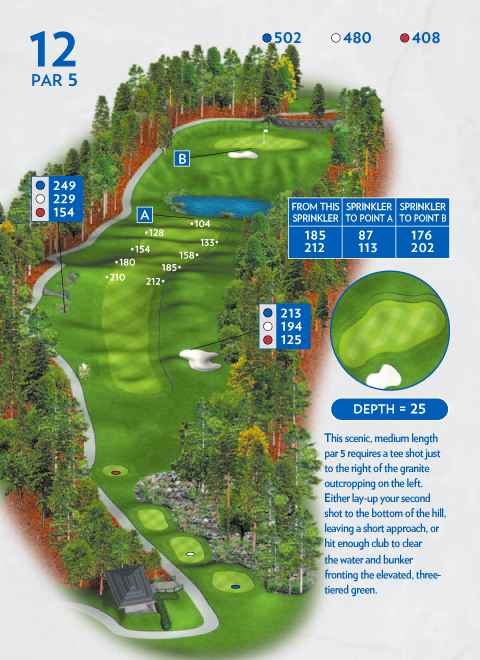
Description
This scenic, medium length par 5 requires a tee shot just to the right of the granite outcropping on the left. Either lay-up your second shot to the bottom of the hill, leaving a short approach, or hit enough club to clear the water and bunker fronting the elevates, three-tiered green.
| Red | 408 |
| White | 480 |
| Blue | 502 |
Hole 13 Par 3
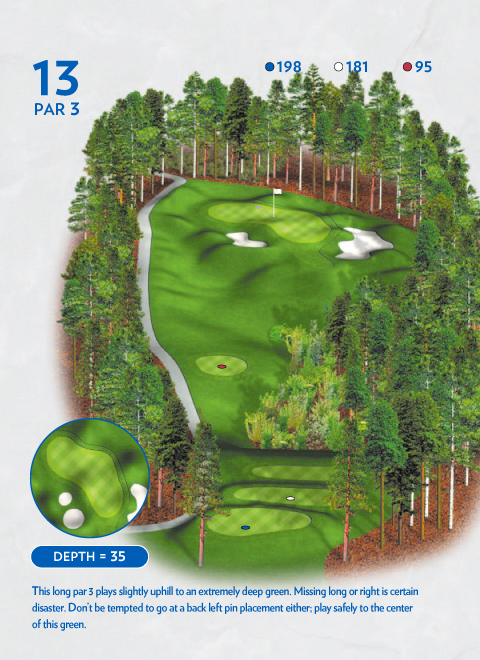
Description
This long par 3 plays slightly uphill to an extremely deep green. Missing long or right is certain disaster. Don’t be tempted to go at a back left pin placement either. Play safely to the center of this green.
| Red | 95 |
| White | 181 |
| Blue | 198 |
Hole 14 Par 4
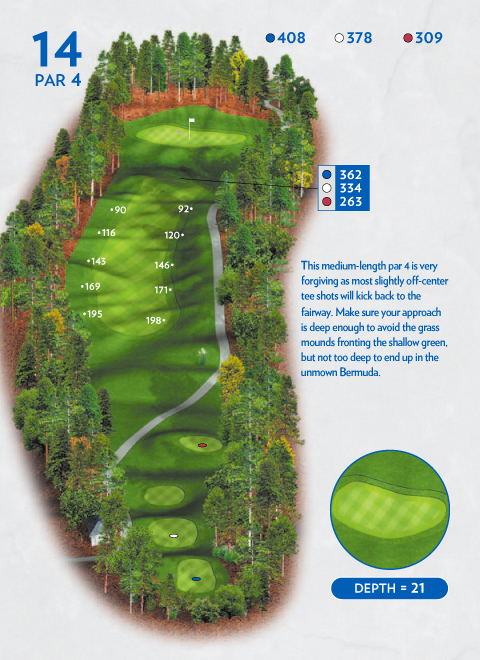
Description
This medium-length par 4 is very forgiving as most slightly off-center tee shots will kick back to the fairway. Make sure your approach is deep enough to avoid the grass mounds fronting the shallow green, but not too deep to end up in the unmown Bermuda.
| Red | 309 |
| White | 378 |
| Blue | 408 |
Hole 15 Par 4
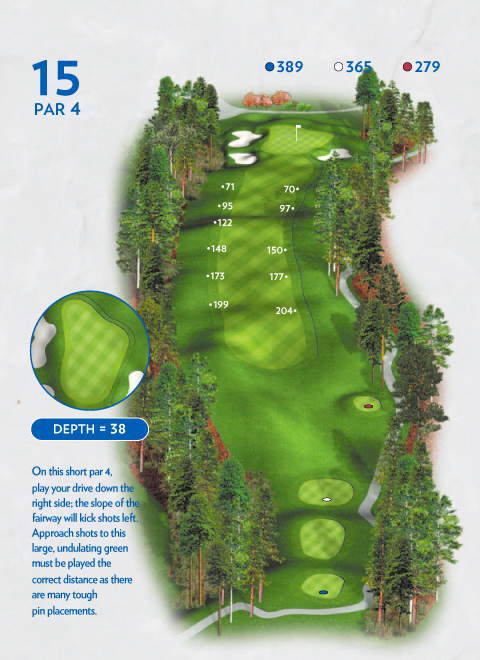
Description
On this short par 4, play your drive down the right side – the slope of the fairway will kick shots left. Approach shots to this large, undulating green must be played the correct distance as there are many tough pin placements.
| Red | 279 |
| White | 365 |
| Blue | 389 |
Hole 16 Par 3
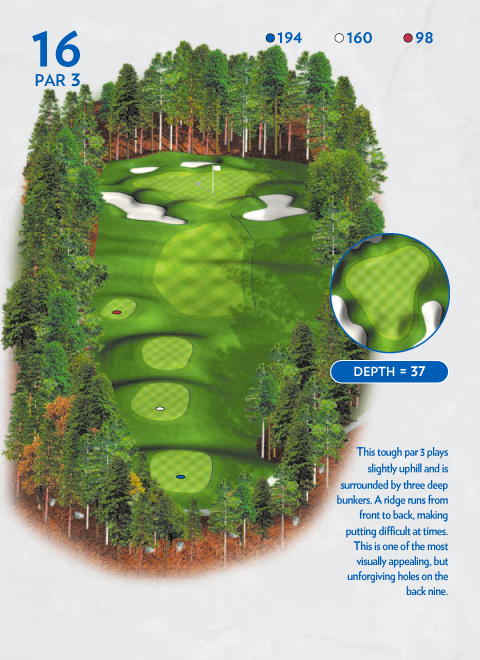
Description
This tough par 3 plays slightly uphill and is surrounded by three deep bunkers. A ridge runs from front to back, making putting difficult at times. This is one of the most visually appealing, but unforgiving holes on the back nine.
| Red | 98 |
| White | 160 |
| Blue | 194 |
Hole 17 Par 4
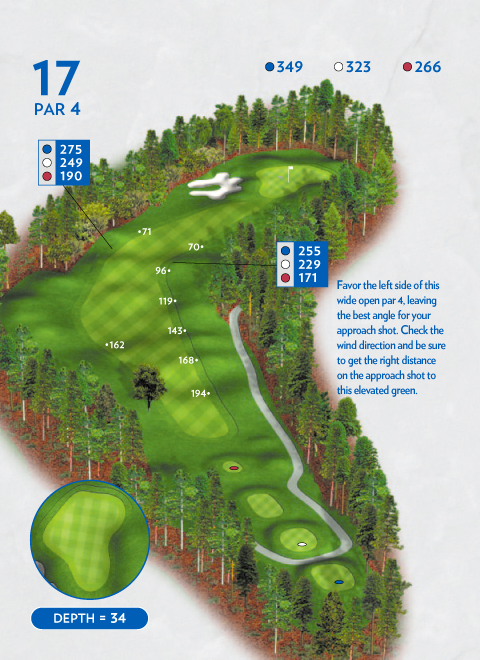
Description
Favor the left side of this wide-open par 4, leaving the best angle for your approach shot. Check the wind direction and be sure to get the right distance on the approach shot to this elevated green.
| Red | 266 |
| White | 323 |
| Blue | 349 |
Hole 18 Par 5
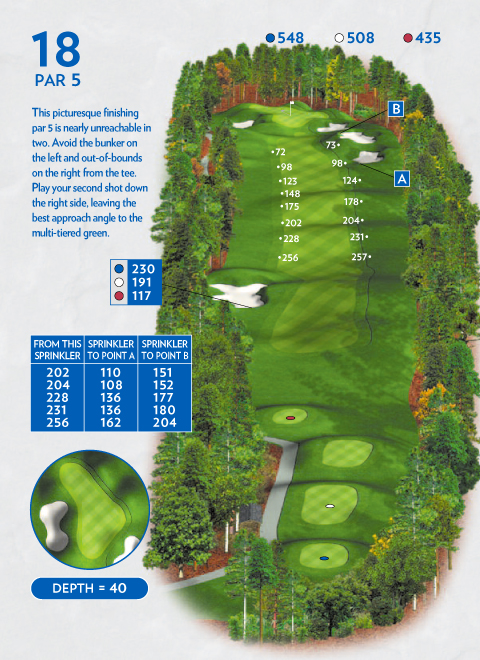
Description
This picturesque finishing par 5 is nearly unreachable in two. Avoid the bunker on the left and out-of-bound on the right from the tee. Play your second shot down the right side, leaving the best approach angle to the multi-tiered green.
| Red | 435 |
| White | 508 |
| Blue | 548 |